
Practical Week
Monday
Career Education Lecture Day:
Business:
This lecture was an overview of marketing and sales. It was 2 hours long and covered a lot of ground. We had a quiz at the end of lecture.
This lecture was an overview of marketing and sales. It was 2 hours long and covered a lot of ground. We had a quiz at the end of lecture.
Insurance:
This lecture was only 30 minutes long and it highlighted the need to learn more about what is required and what is recommended insurance coverage. There was a quiz at the end of the lecture.
This lecture was only 30 minutes long and it highlighted the need to learn more about what is required and what is recommended insurance coverage. There was a quiz at the end of the lecture.
Career Services:
This lecture was the most interesting and helpful of all. We have a career services handbook that is specific to our education and the industry. We went through it together and were able to ask specific questions. We also had a quiz at the end of this lecture.
The lectures went the full length of our classroom time (1:15 - 7:15). For a group of people who like to be up and moving, it was a long day of sitting and listening!
Chef Exam Coaching (Practice) Day:
Chef Sébastien is monitoring our exams this week. We have not had him for any other modules and he does not know us and we do not know him. This is good in some ways but bad in other ways. Rumor has it that he is a very tough grader.
We began the day by going over expectations for recipes, recipe size and when things must be completed and turned in. 1 Chocolate Showpiece, 12 molded Cointreau Bonbon, 1 Chocolate Vacherin and 1 Lemon Tart.
I chose to work on the Chocolate Bonbon and the Lemon Cream for the Lemon Tart. The center of the Bonbon is a Cointreau Caramel Ganache. It can be fussy. You must dry caramelize the sucrose, add hot cream, pour it over milk chocolate couverture, whisk it to the right consistency, add Cointreau, cool it to 30ºc and pipe it into chocolate shells. The shells can not be over or under filled. My ganache got a little too cold and was difficult to pipe. Chef Sébastien gave us all lessons in warming the ganache to the proper temperature and filling the molds properly. Our Bonbon will be examined for its outside appearance and cut in half to determine if the chocolate shell is the correct thickness and for its taste and texture. The chocolate should be shiny and free of nicks and cracks.
Normally, the chocolate shell would be made on the first day, the ganache on the second day and the cap on the third day. I did all three today to practice my chocolate mold filling and capping skills. I should have taken my filled shells out of the chocolate cooler 20 minutes prior to capping them so they could come to a warmer temp. I was also supposed to use a blow dryer to warm my tools and the top of the Bonbon. I took notes and plan to do this on Thursday.
The lemon cream is similar to a Lemon Curd. It has more butter and is cooked on a double boiler. A Lemon Curd would be baked in the tart shell until it firmed up. The Lemon Cream is poured into a baked and cooled tart shell. Everything went well with the Lemon Cream. We are doing half batches and it is somewhat difficult to work with such small quantities.
Our chocolate showpieces require a hollowed out half sphere which we were taught to mold using one method. Chef Sébastien prefers we use a different method. He demonstrated the method and we are all nervous about doing something new on exam day. It is also a little more time consuming method so I am a little concerned about that.
Toward the end of class, Chef Sébastien asked us questions regarding chocolate, tart methods and ingredient functions. We have a written exam first thing tomorrow and I think I am well prepared. I had the urge to skip recipes that we are not doing on the practical but I know, from the first exam, that those questions will be on there too.
Plan For 1st Day:
Chef Sébastien is monitoring our exams this week. We have not had him for any other modules and he does not know us and we do not know him. This is good in some ways but bad in other ways. Rumor has it that he is a very tough grader.
We began the day by going over expectations for recipes, recipe size and when things must be completed and turned in. 1 Chocolate Showpiece, 12 molded Cointreau Bonbon, 1 Chocolate Vacherin and 1 Lemon Tart.
I chose to work on the Chocolate Bonbon and the Lemon Cream for the Lemon Tart. The center of the Bonbon is a Cointreau Caramel Ganache. It can be fussy. You must dry caramelize the sucrose, add hot cream, pour it over milk chocolate couverture, whisk it to the right consistency, add Cointreau, cool it to 30ºc and pipe it into chocolate shells. The shells can not be over or under filled. My ganache got a little too cold and was difficult to pipe. Chef Sébastien gave us all lessons in warming the ganache to the proper temperature and filling the molds properly. Our Bonbon will be examined for its outside appearance and cut in half to determine if the chocolate shell is the correct thickness and for its taste and texture. The chocolate should be shiny and free of nicks and cracks.
Normally, the chocolate shell would be made on the first day, the ganache on the second day and the cap on the third day. I did all three today to practice my chocolate mold filling and capping skills. I should have taken my filled shells out of the chocolate cooler 20 minutes prior to capping them so they could come to a warmer temp. I was also supposed to use a blow dryer to warm my tools and the top of the Bonbon. I took notes and plan to do this on Thursday.
The lemon cream is similar to a Lemon Curd. It has more butter and is cooked on a double boiler. A Lemon Curd would be baked in the tart shell until it firmed up. The Lemon Cream is poured into a baked and cooled tart shell. Everything went well with the Lemon Cream. We are doing half batches and it is somewhat difficult to work with such small quantities.
Our chocolate showpieces require a hollowed out half sphere which we were taught to mold using one method. Chef Sébastien prefers we use a different method. He demonstrated the method and we are all nervous about doing something new on exam day. It is also a little more time consuming method so I am a little concerned about that.
Toward the end of class, Chef Sébastien asked us questions regarding chocolate, tart methods and ingredient functions. We have a written exam first thing tomorrow and I think I am well prepared. I had the urge to skip recipes that we are not doing on the practical but I know, from the first exam, that those questions will be on there too.
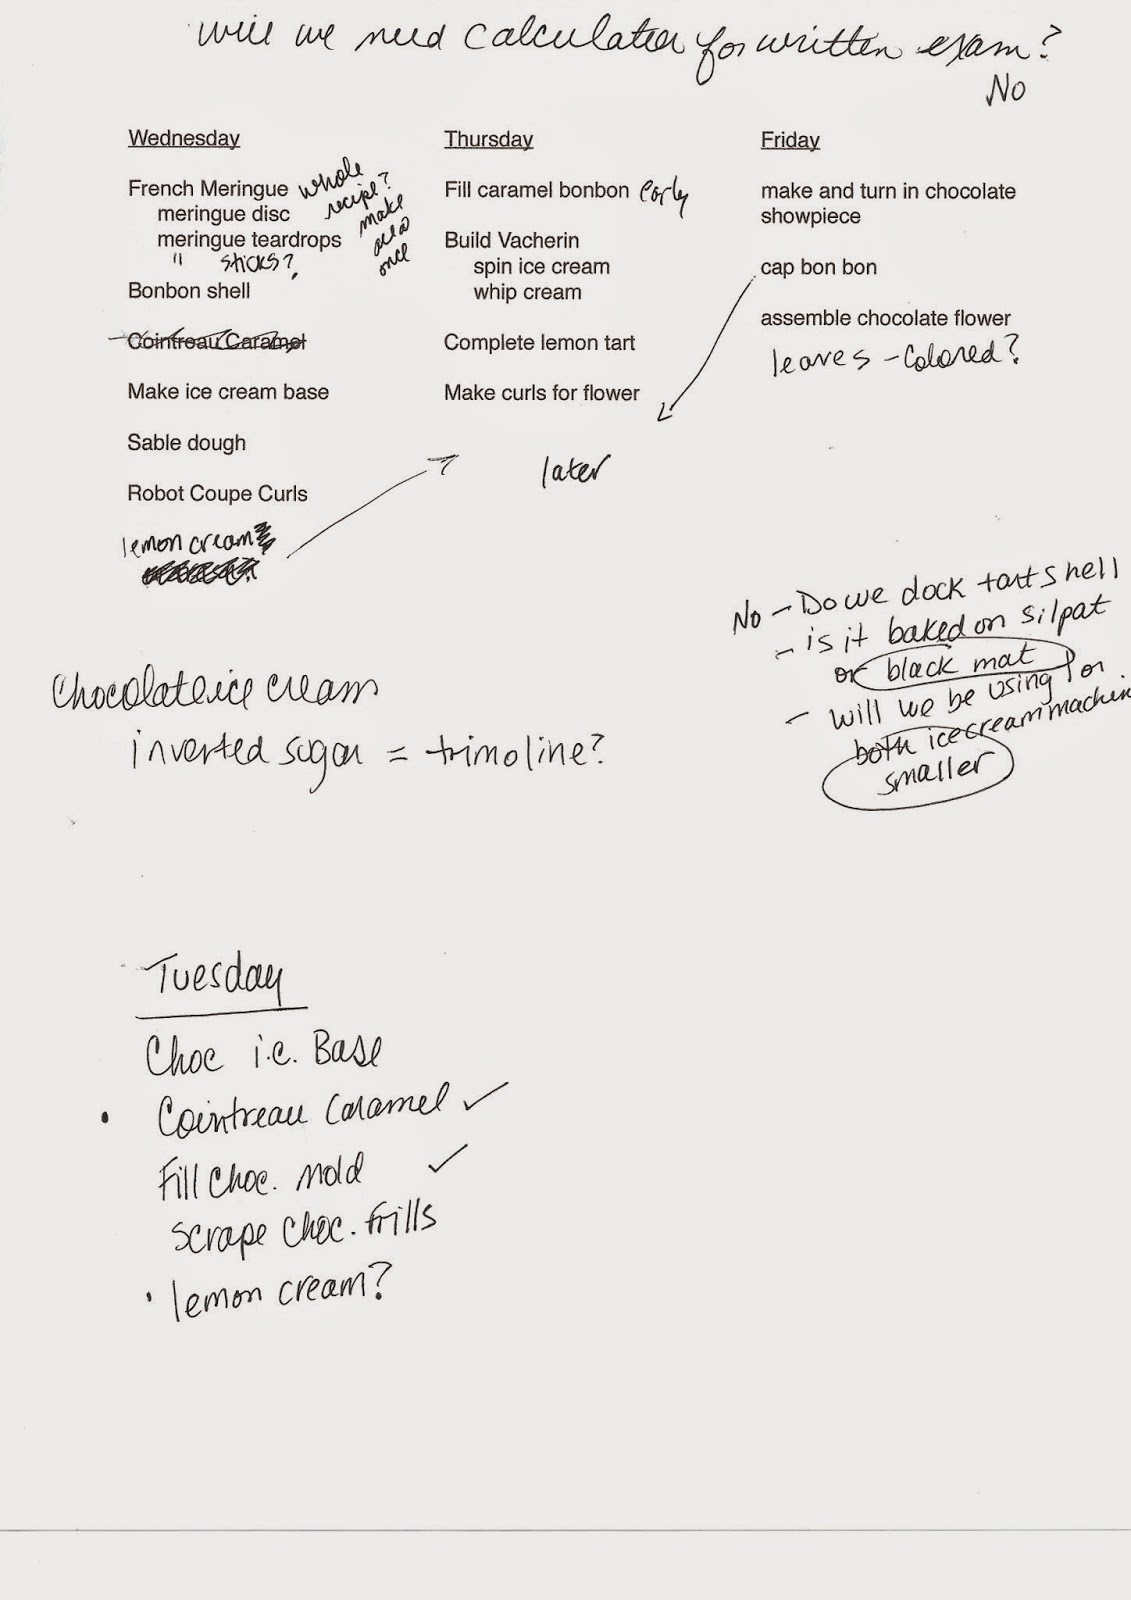
Plan For 1st Day:
- Scale ingredients for all the recipes.
- Make French Meringue and pipe circles, drops and sticks.
- Make Chocolate Ice Cream Base. Store in cooler overnight.
- Make Pate Sablée. Store wrapped in cooler overnight.
- Make Lemon Cream. Store in cooler overnight.
- Make chocolate shells for Bonbon. Store in chocolate cooler overnight.
- Make chocolate dome.
- Shave chocolate petals for Chocolate Rose.
I have an incredible partner and it has made all the difference toward feeling relaxed. She is neat and organized and very nice. A few people are not as lucky and it definitely adds to the anxiety.
If I get the first 6 tasks done then I will continue on down the list. The Lemon Tart must be turned in on Thursday and the Vacherin can be but is not required..
Wednesday
Exam Day 1:
Class began with our written exam. The exam was true/false, fill in the blank and multiple choice and covered tarts, ice cream, sorbet, chocolate candies and chocolate showpiece. I knew all of the questions regarding process but struggled a little with specific questions regarding solid content and temperatures of ingredients. An example would be; What is the solid content of whole milk? By FPS standards, what is the guideline for sugar content in sorbets.
Our instructions for the exam had been added to and altered and there seemed to be some general confusion about who hat heard what. Half recipes were now full recipes, solid chocolate circles were now supposed to be colored and the method for filling chocolate spheres was completely different than the method we were taught. A few people made half recipes of Lemon Cream. The rest of us will discreetly share the extra we have so that their tarts look full.
We were taught one method of casting a hollow chocolate dome. Chef Sébastien prefers another method, demoed it and then left it up to us to choose. He seemed to prefer his method so I decided I should try it. It is a little more time consuming and I am concerned that the walls of the shell are too think to support the mini showpiece. This was a big point of discussion among ourselves and each student chose the method that was best for them.
Order of Tasks Completed:

Exam Day 2:
Very busy day. I began by getting organized and collecting ingredients and tools. The first organized task was to spin our chocolate ice cream base in the ice cream machine. Chef had us go in order by table number. Each table combined their bases and spun them together. Each base had to be hand blended and then approved before spinning. Immediately afterward, we filled a 140 cm cake ring, lined with acetate, with two French Meringue discs and fresh chocolate ice cream. We froze ours, removed the cake rings later and plan to cover them with Chantilly Cream tomorrow.
It was a very humid day and my Sablée dough softened up very quickly while I was rolling it out. I put it in the cooler for 30 minutes and then pressed it into a tart ring. It went back into the cooler, into the convection oven for 15 minutes, cooled completely, got an egg wash and then back in the oven for 10 minutes. When it cooled again, I smoothed out the rough edges with a microplane.
I made the Cointreau Ganache next. This needs to cool to exactly 30ºc and then piped into our chocolate shells. The chocolate shells must be removed from the chocolate cooler 20 minutes before they are filled. I remembered to blow dry the molds before filling them and the ganache was a good consistency for piping. I filled the molds a little too high but Chef checked them and said they were fine. The chocolate candies went in the chocolate cooler for the night. I will cap them tomorrow.
Between making chocolate curls and fall colored, chocolate leaves, I was starting to run out of time so I hand blended my Lemon Cream and filled my tart shell. I popped it in the freezer for 5 minutes, topped it with French Meringue drops and turned it into Chef for grading. He cuts a slice from each person's tart, places it on a parchment lined tray that is divided into 16 squares with each of our names on it.
I was happy with my tart. It was a good color and looked clean.
I worked on my chocolate sculpture and hour before we had to stop. I chose to build it assymetrically and hope that it ends up looking balanced and not messy. We have to spray them in the morning with brown cocoa butter.
My final task was to roll a couple white chocolate curls for the chocolate sculpture. Chef called time and we all cleaned up the kitchen.
I am exhausted.
To Do List for Tomorrow:

Class began with our written exam. The exam was true/false, fill in the blank and multiple choice and covered tarts, ice cream, sorbet, chocolate candies and chocolate showpiece. I knew all of the questions regarding process but struggled a little with specific questions regarding solid content and temperatures of ingredients. An example would be; What is the solid content of whole milk? By FPS standards, what is the guideline for sugar content in sorbets.
Our instructions for the exam had been added to and altered and there seemed to be some general confusion about who hat heard what. Half recipes were now full recipes, solid chocolate circles were now supposed to be colored and the method for filling chocolate spheres was completely different than the method we were taught. A few people made half recipes of Lemon Cream. The rest of us will discreetly share the extra we have so that their tarts look full.
We were taught one method of casting a hollow chocolate dome. Chef Sébastien prefers another method, demoed it and then left it up to us to choose. He seemed to prefer his method so I decided I should try it. It is a little more time consuming and I am concerned that the walls of the shell are too think to support the mini showpiece. This was a big point of discussion among ourselves and each student chose the method that was best for them.
Order of Tasks Completed:
- Scale ingredients for all recipes.
- Parchment drawings for piping French Meringue.
- French Meringue. Bake for 2 hours. Left in oven overnight to dry.
- Make Sablée dough. Place in cooler overnight.
- Chocolate Ice Cream base. Placed in cooler overnight.
- Lemon Cream. Placed in cooler overnight.
- Caste chocolate components for Chocolate Showpiece.
- Remove molds around chocolate components (affects grade).
My partner and I were told twice by Chef Sébastien that we were working very clean. I have not made any major mistakes thus far. Working with Jamie is very relaxing and easy. It gets frustrating moving around the kitchen during exams when tensions are high. Some people race around the kitchen and end up bumping into everyone. Others leave their dishes to build up and the dish area becomes a mess. There is often a line for tools that are in demand and some people want to cut in line, "because it will only take a second." They do not realize that they are the fifth person to ask. I wish they would just get in line and wait their turn.
To Do List for Day 2:
- Chocolate rose petal curls.
- Make Cointreau Ganache.
- Fill Bonbon shells with Cointreau Ganache.
- Spin Ice Cream.
- Build Chocolate Sculpture base.
- Spray Chocolate Sculpture base.
- Bake tart shell.
- Fill and decorate tart shell with French Meringue teardrops (due).
- Cap Bonbon shells.
- Build Vacherin.
- Make chocolate leaves for Chocolate Showpiece.
- Make white chocolate curls for Chocolate Showpiece.
Only If I Have the Time:
- Cover Vacherin with Chantilly Cream.
- Decorate Vacherin with French Meringue decor and Chantilly Cream piping.
Our self evaluation essays were returned to us. I received a 14 our of 15.
The first day of practicals is the most challenging day. It is long and tiring. As I look at the list for tomorrow, I think tomorrow is not going to be a easy as I had originally thought.
Thursday
Exam Day 2:
Very busy day. I began by getting organized and collecting ingredients and tools. The first organized task was to spin our chocolate ice cream base in the ice cream machine. Chef had us go in order by table number. Each table combined their bases and spun them together. Each base had to be hand blended and then approved before spinning. Immediately afterward, we filled a 140 cm cake ring, lined with acetate, with two French Meringue discs and fresh chocolate ice cream. We froze ours, removed the cake rings later and plan to cover them with Chantilly Cream tomorrow.
It was a very humid day and my Sablée dough softened up very quickly while I was rolling it out. I put it in the cooler for 30 minutes and then pressed it into a tart ring. It went back into the cooler, into the convection oven for 15 minutes, cooled completely, got an egg wash and then back in the oven for 10 minutes. When it cooled again, I smoothed out the rough edges with a microplane.
I made the Cointreau Ganache next. This needs to cool to exactly 30ºc and then piped into our chocolate shells. The chocolate shells must be removed from the chocolate cooler 20 minutes before they are filled. I remembered to blow dry the molds before filling them and the ganache was a good consistency for piping. I filled the molds a little too high but Chef checked them and said they were fine. The chocolate candies went in the chocolate cooler for the night. I will cap them tomorrow.
Between making chocolate curls and fall colored, chocolate leaves, I was starting to run out of time so I hand blended my Lemon Cream and filled my tart shell. I popped it in the freezer for 5 minutes, topped it with French Meringue drops and turned it into Chef for grading. He cuts a slice from each person's tart, places it on a parchment lined tray that is divided into 16 squares with each of our names on it.
I was happy with my tart. It was a good color and looked clean.
I worked on my chocolate sculpture and hour before we had to stop. I chose to build it assymetrically and hope that it ends up looking balanced and not messy. We have to spray them in the morning with brown cocoa butter.
My final task was to roll a couple white chocolate curls for the chocolate sculpture. Chef called time and we all cleaned up the kitchen.
I am exhausted.
To Do List for Tomorrow:
- Spray chocolate sculpture.
- Cap Bonbon.
- Cover and decorate Vacherin.
- Build chocolate flower.
- Decorate chocolate sculpture.
- Turn in finished products on time.
Friday

We sprayed our Chocolate Sculpture first so that they could dry before decorating them.
I whipped my Chantilly Cream to soft peak and made sure not to over whip it so that it became too firm or grainy. The Vacherin gets frosted with Chantilly Cream and then decorated with French Meringue Sticks and decorative piping. I asked Chef Sébastien if I could use his St. Honore tip and he said no. He was more concerned with the texture of the Chantilly Cream and that it looked neat. I used a large star tip and one of my chocolate circles. It had to be at the right temperature when he graded it. I put it in the cooler for 20 minutes and then presented it.
I capped the Bonbon next. They were better than ones I have done before but were still not perfect. I presented them later in the day on the same tray as my chocolate sculpture.
I assembled my Chocolate Rose and placed it in the chocolate cooler to firm up before I placed it on my Chocolate Sculpture.
My chocolate leaves did not have the bright color I would have liked them to have. I thought it might be that the colored cocoa butter was too thin but other people had bright leaves. Our sculptures were small and the components were few so I was concerned that the back looked bare. Another student had already turned her showpiece in and said that he did not look at the back so I focused on the front. It turned out okay but other people had more elaborate decorations and better flowers.
Chef said that my Chocolate Bonbon were good. He cut one in half and the shell was even all the way around. They were a little dull but Chef said it was most likely caused by rough molds.
We all got done quickly and deep cleaned so that we were dismissed a half an hour earlier than usual.
This practical was definitely less stressful than the first. There were many small parts to complete but it was not overwhelming or chaotic.
Friday Night.

Two very good friends, Cathy and Elizabeth, came to visit from Milwaukee. We went to BoHo House, which serves Bohemian food, and ate my practicals for dessert. Late in the evening, we crunched up my Chocolate Sculptures and had fun taking them apart.
Saturday
We took the brown line to Armitage and walked to Floriol for lunch. We shared the Veggie Croque, Quiche and Veggie Tartine. I tried the Cheddar and Bacon Croissant and the Pumpking Sweet Roll. Everything was delicious.
We sprayed our Chocolate Sculpture first so that they could dry before decorating them.
I whipped my Chantilly Cream to soft peak and made sure not to over whip it so that it became too firm or grainy. The Vacherin gets frosted with Chantilly Cream and then decorated with French Meringue Sticks and decorative piping. I asked Chef Sébastien if I could use his St. Honore tip and he said no. He was more concerned with the texture of the Chantilly Cream and that it looked neat. I used a large star tip and one of my chocolate circles. It had to be at the right temperature when he graded it. I put it in the cooler for 20 minutes and then presented it.
I capped the Bonbon next. They were better than ones I have done before but were still not perfect. I presented them later in the day on the same tray as my chocolate sculpture.
I assembled my Chocolate Rose and placed it in the chocolate cooler to firm up before I placed it on my Chocolate Sculpture.
My chocolate leaves did not have the bright color I would have liked them to have. I thought it might be that the colored cocoa butter was too thin but other people had bright leaves. Our sculptures were small and the components were few so I was concerned that the back looked bare. Another student had already turned her showpiece in and said that he did not look at the back so I focused on the front. It turned out okay but other people had more elaborate decorations and better flowers.
Chef said that my Chocolate Bonbon were good. He cut one in half and the shell was even all the way around. They were a little dull but Chef said it was most likely caused by rough molds.
We all got done quickly and deep cleaned so that we were dismissed a half an hour earlier than usual.
This practical was definitely less stressful than the first. There were many small parts to complete but it was not overwhelming or chaotic.
Friday Night.
Two very good friends, Cathy and Elizabeth, came to visit from Milwaukee. We went to BoHo House, which serves Bohemian food, and ate my practicals for dessert. Late in the evening, we crunched up my Chocolate Sculptures and had fun taking them apart.
Saturday
We took the brown line to Armitage and walked to Floriol for lunch. We shared the Veggie Croque, Quiche and Veggie Tartine. I tried the Cheddar and Bacon Croissant and the Pumpking Sweet Roll. Everything was delicious.


