Kathleen's Cakes

Sharing my experience of attending the French Pastry School while managing CakeVase, my life, family and friends.
Showing posts with label gum paste. Show all posts

Saturday, August 16, 2014

The French Pastry School-Week Six - Wedding Cake

       L'Art de la Pâtisserie  Week 6


Monday


Wrapping flowers with floral tape:
  • Cut floral tape with cutting tool.
  • Start wrapping ½" below flower, push floral tape toward flower base and wrap thinly all the way down the wire.
Color dusting gum paste flowers:
  • Less is more.
  • You can always add more color but you can not take it away.
  • Clean the brush by dipping it into cornstarch.
  • Use clean hands.
  • Pump brushes are a convenient way to distribute color on a larger surface.
  • Steam flowers for a couple of seconds to hold in the color.
  • Do not blow on flowers.
  • Lighten dark dusting powder with cornstarch.
  • The size of the brush depends on the fragility of the flower.
Daisy:
  • Use pump brush to dust inside with super pearl luster dust.
  • Dust yellow on daisy center.
  • Dab green on daisy center.
  • Dust green on calyx.
Blossom:
  • Dust front of petals with pale yellow.
  • Dust back of petals with brighter yellow.
  • Dust green on the calyx of blossom.
Carnation:
  • Lighten fuchsia with cornstarch.
  • Use medium size brush.
  • Dust the edges only.
  • Dust green on the calyx.
Rose:
  • Dust the edges of the petals.
  • Dust inside base of petals darker to add shading.
  • Dust subtle lines on back of petals to add texture by starting at base of flower and working upward.
  • Make the bud center a little darker.
  • Dust the rose hip and calyx green.
Rose Leaves:
  • Using a generous amount of green, dust in the center, drag outward and then across leaf in the impression grooves.
  • Spray lightly with confectioner's glaze to add shine.
Lily:
  • Dust a small amount of green on base, wire indentation and up the sides and middle.
  • Dust light purple on impression lines.
  • Dust darker purple on middle of petal.
  • Paint dots onto colored areas with edible marker or vodka diluted food color.
Orchid:
  • Highlight the base and the tip with color of choice.
  • Highlight ruffles with a darker pigment.

Flower Assembly:

Rose Leaves:
  • One leaf is wrapped together with two smaller. leaves
  • Line them up and curve them so that they look natural.
Orchid:
  • Center surrounded by three flat petals.
  • Ruffled petals underneath and between flat petals.
Lily:
  • Line five stamens up with lily center.
  • Tape three petals.
  • Tape three petals underneath and between.
  • Keep bottoms of petals level and do not overlap.
Posy:
  • Largest rose in the center.
  • Surround large rose with three smaller roses.
  • Place daisy, carnation and blossoms in between and around roses.
  • Add leaves directly below and next to each rose.
  • Arrange flowers in a dome shape.
  • Tape flowers together, cutting wires that are too long.
  • Use needle nose pliers to arrange flowers naturally.
Tuesday

Covering styrofoam cake with fondant:
  • Sand sharp edges off of styrofoam cakes.
  • Sand in one direction to achieve soft, uniform edges.
  • Break fondant into workable pieces.
  • Knead fondant until smooth.
  • Cover fondant pieces with plastic wrap when not being used.
  • Run styrofoam cake under water and place on paper towels to soak up excess.
  • Use a shaker to generously coat work surface.  This keeps fondant from sticking.
  • Using a silicone fondant rolling pin or pvc pipe, roll fondant from the center outward.
  • Turn fondant, repeat.
  • Roll fondant onto rolling pin, lift and lay fondant over top of cake.
  • Secure top and top third of cake to prevent tearing.  
  • Work out pleats.
  • Cut excess fondant away from the cake.
  • Use fondant smoothers to smooth out the top and sides of cake.
Fondant will tear on the sharp edges of styrofoam cakes and sanding them prevents this from happening.  Fondant does not cover up mistakes, it highlights them.  Tall and small cakes are more difficult to cover that wider and shorter cakes.  You may use water, shortening or piping gel to make fondant stick to styrofoam.  Fondant on a styrofoam cake should be ½" thick.  Fondant on a real cake should be ¼" thick.  Use a dowel and rubber mallet to make a hole large enough to accommodate posy on top tier of cake.

Covering a cake board:
  • Spread piping gel or shortening around the edge of board.
  • Roll out fondant.
  • Place fondant on board.
  • Trim fondant to be flush with board.
  • Place cake on center of board.
  • Cut around cake.
  • Lift up cake and peel center fondant.
  • Place cake back down on center of board.
Fondant is expensive.  Learn to, "work smart."  Massa Ticino is a nice brand of commercial fondant.  It maintains elasticity, has a neutral flavor and accepts flavored oils (which do not change the color) well.  It is expensive but can be rolled very thin.  Satin Ice is also a commercial option.  It is less expensive and has good elasticity but is not flavor neutral.  The most available flavors are vanilla and chocolate.  They make red, royal blue and black fondant, which is virtually impossible to make in the kitchen, and is the best bet when these colors are requested.  

Albert Uster has pliable gum paste that has a good dry time and works well for modeling and flower making. They have a color of they year and keep them available for six years after their release.

Chef Rubber, Chef Master and Country Kitchen have good color gel that does not fade.

Pfeil & Holing has good tylose for making gum paste.


Wednesday


Fifth Stage:

Floriol - 1220 W. Webster Ave, Chicago, Illinois

7:00am - 12:00pm  Owner: Sandra Holl    Baking Manager: Betsy Grzywa

I made an egg wash using egg yolks, a pinch of salt and cream.  This gets hand blended, labeled and refrigerated.  I juiced some oranges and buttered bread and muffin tins.  I then scooped savory scones.  One of the bakers walked me through the lemon blueberry scone mixing process.  They add lemon zest and buttermilk for a really moist and flavorful batter.  We scooped the scones by sprinkling frozen blueberries on top of the batter without mixing them in.  This kept the blueberries from bleeding.  The scones get topped with cream and coarse sugar.

A bread baker gave me a tour of the rooftop garden.  There were greens, herbs, peppers, cucumbers and edible flowers.  They use a passive watering system and it gets a lot of sun.  The plants were thriving.

Class:


Egg White Royal Icing:
  • Clean mixing bowl.
  • Sift 10x.
  • Mix egg whites with cream of tartar.
  • Paddle on low.
  • Incorporate 10x slowly.
  • Scrape side of bowl periodically.
  • Paddle to stiff peak, approximately ten minutes or until royal icing is pure white.
Meringue Powder Royal Icing:
  • Clean mixing bowl.
  • Sift 10x.
  • Mix meringue powder with water.
  • Paddle until powder has dissolved and bubbles appear.
  • Paddle on low.
  • Incorporate 10x slowly.
  • Scrape sides of bowl periodically.
  • Paddle to stiff peak, apporoximately ten minutes or until royal icing is pure white.
Tartaric acid is in meringue powder and makes royal icing stiffer.  Meringue powder royal icing is better for string work.  Wet royal icing is best for flood work.  If meringue powder royal icing is to stiff, add water.  If it is too loose, add 10x.

For both types of royal icing, store in tall deli cup with plastic wrap directly on the surface.  Place a damp paper towel on plastic wrap and cover with another layer of plastic wrap.  Cover.   Egg white royal icing will last two weeks in cooler.  

50/50 Paste:
  • Equal parts fondant and gum paste.
  • Has good blend of elasticity and work time.
  • 70% gum paste and 30% fondant is a good ratio for using molds.
  • For every 100g of fondant, add 2 teaspoons of tylose to make gum paste.
  • for every 100g of fondant, add 1 teaspoon to make 50/50.
Assembling the Cake:
  • Use royal icing or tape to attach the tiers together.
  • Make sure it is centered.
  • Using needle nose pliers, place posy before decorating tiers.
  • Rearrange flowers.
Fondant Border:
  • Roll 50/50 paste into a log, flatten.
  • Run through paster roller to #5 thickness.
  • Lightly crisco work surface.
  • Place 50/50 strip on work surface.
  • Trim straight edge on bottom strip.
  • Press infinity cutter neatly and cleanly.
  • Lift border with pallet knife.
  • Ruffle edges of border detail.
  • Apply water on side of cake.
  • Place border onto cake.
  • Trim joint using a pairing knife.
  • Frill as desired.
Always add a border unless no border is specifically requested.

Bead Mold Border:
  • Roll 50/50 into snake slightly wider than the bead mold.
  • Press 50/50 into bead mold.
  • Use rolling pin over the dough.
  • Scrap off excess 50/50 with a non sharp knife.
  • Turn mold over, press bead border out with thumb while holding mold slightly above work surface.
  • Pipe two long tubes for bead border to attach.
  • Apply bead border on an angle, until border is at a 45º angle.
  • do not press too hard.
Do not roll an uneven snake, under fill or over fill the mold.

Royal Icing Border:
  • Keep piping bag wrapped in wet paper towel when not actively piping.
  • Start on back of cake.
  • Pipe a bead or shell border.  
  • Pipe scrolls or dots on side of cake.
  • Pipe writing in cursive for adults and print for children.

Thursday

Pâte a Choux for Croque em Bouche:
  • Have parchment lined sheet pans ready.
  • To avoid splash, add butter to pot first.
  • Add liquids and salt.
  • Fully melt the butter.
  • Bring to a boil briefly.
  • Pour sifted flour in.
  • Stir, stir until starch cooks, paste dries out and a thin coating lines the bottom of the pan.
  • Put paste in mixer bowl.
  • Paddle on high for thirty seconds to dissipate steam.
  • Mix on low.
  • Add eggs very slowly.
  • Scrape down sides occasionally.
  • final consistency should be shiny, smooth and elastic.
  • A slow drip in a V shape from the paddle means paste is ready.
  • Using a #11 tip, pipe quarter size round shapes. 
  • Avoid a pull tip.
  • Pipe staggered.
  • Use water to tamp down any stray points.
  • Do not use an egg wash.  Caramel will give it a nice amber color.
  • Freeze piped raw paste and bake at a later time or bake immediately.
  • Bake 20 minutes with vent closed and 20 minutes vent open.
  • Break puff open to check for doneness.  Inside should be completely dry.
  • Use immediately or freeze overnight and flash bake when ready to build croque em bouche.  
Recipe has no sugar and more eggs so that puffs will bake in a round shape.  Using 50-50 water to milk makes pâte a choux less dense than using all milk.  Adding the right amount of eggs is up to the discretion of the cook.  Sometimes all of the eggs are not necessary and other times all of the eggs are necessary plus some additional warm milk.  If the paste is too moist it can not be saved and must be thrown away.  Puffs will bake 1.5 times their original size.

Croque em bouche has three elements; nougatine as the base or decoration, pâte a choux and a sugar decoration element.  Typically filled with pastry cream, creameux or praline and will stay at room temperature for one hour.  For decorative croque em bouche, puffs are left hollow.  Croque em bouche can not be refrigerated because the caramel will melt.  Pipe 80-100 puffs per croque em bouche. 

Nougatine:
  • Have ready; small pot, two silpats. cutting board, half sheet tray with parchment, large knife, nougatine cutter and heavy duty metal rolling pin.
  • Microwave almonds and keep them warm to increase workable time.
  • Microwave glucose to release it.
  • In a pan, warm glucose over medium heat.
  • Add sucrose a little at a time.
  • Add sorbitol solution.
  • Caramelize mixture on low heat until golden brown color.
  • Add silvered almonds and butter.
  • Stir.
  • Pour onto silpat.
  • Cover with other silpat.
  • Press down and flatten with rolling pin.
  • Start rolling.
  • Roll to thickness of the almonds.
  • Transfer to a cutting board.
  • Hammer down nougatine cutter.
  • Transfer to parchment covered half sheet pan (will stick to silpat when cool).
  • Cut scraps into 1" strips and strips into uniform triangles (18-20 triangles for 8" round).
  • Scraps may be rewarmed in 325ºf oven for 2-3 minutes and rerolled.  
  • Wrap nougatine in plastic wrap and store at room temperature.
Sorbitol works as an emulsifier and retains moisture which lengthens shelf life   Sorbitol solution is water and sorbitol.  Cut powdered sorbitol in half and add same amount of water to turn into liquid sorbitol.  4.5g of sorbitol + 4.5g water = sorbitol solution.  Avoid sugar crystals in the caramel as they weaken its structure and make it brittle.

Deep Clean:

We deep cleaned on Thursday instead of Friday.  My partner and I were on garbage and paper towel duty.  Deep clean includes cleaning the inside and outside of all the garbage cans and replacing the paper towel supply.

Verbal Evaluation:

Teamwork, product and organization were good this week.  My attitude has room for improvement.  After having run my own cake business for twelve years, I had to find a new way of looking at cake decorating.  Chef Megan taught techniques I have never used and the results were frustrating.  It was a challenge to stay motivated about a subject I have somewhat exhausted but I definitely learned new things and was pushed out of my comfort zone.

Friday

Isomalt Fountain:

  • Oil ring molds.
  • Warm confectionary funnel in 200ºf oven.
  • Draw stencils on parchment.
  • Place silpat over parchment.
  • Add water to pot.
  • Sprinkle isomalt in slowly.
  • Melt gradually.
  • Cook to 165ºc.
  • Let sit until bubbles dissipate. 
  • Pour into funnel over silpat.
  • Pour ¼" thickness into rings.
  • Make 12 wings by pouring isomalt into stencil shapes.
  • Keep excess isomalt warm on low heat.

Isomalt is synthetic sugar.  It has half the calories and sweetness of sucrose.  Ingesting more than 50g a day may cause stomach upset.  It is good for casting and pulling sugar, does not turn brown like sucrose, is less affected by humidity than sucrose but is more expensive than sucrose.  When cooking isolmalt, use 10% of its weight in water.  More than 10% and isomalt will not set.  Less than 10% and isomalt sets too fast.

Isomalt takes color better and will not crystallize as easily as sucrose.  Pour isomalt over a photo to make an instant sugar showpiece.

Building Isomalt Fountain:

  • Use isomalt to glue two bases together.
  • Glue wings at bottom of center points.
  • Make sure the wings are sitting up straight.


Assemble Nougatine Base:

  • Choose uniform triangles.
  • Remix meringue royal icing on low.  The cooler makes it dense and less pliable.
  • Do not overfill icing bag.
  • Glue triangles around nougatine circle using warm isomalt.
  • Place triangles at a 45º angle using puffs to support them while they cool.
  • Use small star tip to pipe royal icing around edges of triangles.
  • Turn nougatine base upside down on a deli cup.  
  • Using a #1 or 2 tip, pipe royal icing string work from tip to tip of each triangle.  String work should look like a basket handle.
  • Allow string work to dry at least an hour.
  • Turn nougatine base right side up.
  • Glue nougatine base to cake board or cake stand.
Caramel for assembling Croque em Bouche:
  • Microwave glucose.
  • Add water to pot first.
  • Add sugar all at once.
  • Add glucose.
  • Dissolve sugar.
  • Turn up the heat and skim impurities from the surface using a skimmer in a bowl of water.
  • Skim until it starts boiling.
  • Use a clean brush and clean water to wash the sides of the pan.  Do not add too much additional water or the cook time will be greatly increased.
  • Stop cleaning the sides of the pan around 115ºc.
  • Cook to 160ºc.
  • Add tartaric acid.
  • Cook further to 165ºc.
  • Turn heat down to low.
  • Make an aluminum foil collar to keep sugar from dripping.
  • Dry caramel hardens faster and gets browner.  This application uses more water to slow the brown.  Tartaric acid retards crystallization and keeps solution more pliable.  Equal parts powder cream of tartar and hot water make tartaric acid.

Assembling the Croque em Bouche:

  • Dip each puff ⅓ into caramel.  Only dip ⅓ of the puff to prevent burning fingers.
  • Dip ½ of puffs in plain caramel.
  • Dip ½ of puffs in almond and sucre grande mixture.
  • Using oiled cake ring to form the shape, attach puffs with hot caramel tightly around the circle.
  • Use thumb to anchor the puffs while forming the first layer.
  • Do not leave space in-between puffs on bottom two layers or structure will be fragile.  The bottom two layers must support the weight of the top layers.
  • Do not use too much caramel as glue or croque em bouche will look drippy.
  • Face almond/sucre grande toward outside.
  • Alternate plain caramel row with almond/sucre grande row.
  • Stagger puffs and push them together tightly without spaces.
  • Glue three sides of last puff to secure row.
  • Take the cake ring off after second row.
  • The third layer is angled.
  • Glue side that is furthest away.
  • Glue and then slightly bend/angle toward inside.
  • Do not angle them too much.
  • Build evenly.
The cone shape is traditional.  If silpat is not available, lightly oil parchment paper.

Practical Instructions and Schedule:

Practical exams are next week.  Monday and Tuesday are practice days.  The written exam is first thing Wednesday.  Wednesday, Thursday and Friday are baking and presentation of product days.  We were given the recipes and rules for production and time.  


Final Thoughts

Do not pay a machine to do what you can do by hand.  Just get better at the task.


Sunday, August 10, 2014

The French Pastry School-Week Five - Wedding Cake

                                                                 L'Art de la Pâtisserie  Week 5


Monday


Chef Sunny Lee and Chef Megan McCarthy
Wedding cakes: bake, torte, assemble, frost and pipe buttercream.
New Table and partner.  Cleaning duty: Sweep

French Sponge Cake:
  • Sift flour.
  • Gather parchment lined sheet pan and cake rings.
  • Gather a large mixing bowl.
  • Whip egg yolks, trimoline and sugar.
  • Whip on high until ribbon stage.  
  • Clean mixer bowl of fat residue.
  • Whip egg whites, sea salt and cream of tartar on medium speed.
  • Start adding sugar at soft foamy stage.
  • Add sugar little by little.
  • Meanwhile, melt butter with vanilla paste.
  • Watch meringue for peaks on the side of the whisk.  Should not be runny.
  • Whisk/fold flour into egg yolks in thirds.  Do not over mix.  It is okay if there are streaks at this point in the process.  Just make sure they are folded in at the end.
  • Add a little batter to the melted butter and mix completely.
  • Whisk/fold the meringue into the egg/flour mixture.  Do not deflate.
  • Fold butter mixture into batter until well combined.
  • Fill cake ring ¾ full.
  • Conventional oven is okay.  Convection will brown the outside too fast.
  • 350ºf for 35 minutes.
French sponge cake is called a biscuit.  The difference between a biscuit and a genoise is that a biscuit whips the whites and the yolks separately and a genoise has whole whipped eggs.  Biscuit is the most delicate of all the sponge cakes.  It can't hold much weight and is not good for stacking a tall cake.  American sponge is much denser.

Humidity causes cake flour to clump and must be sifted or lumps will remain in the finished cake.  Egg yolks get whipped first and egg white second.  Egg whites must be used right away and egg yolks are more stable so they do not deflate as quickly.  Using trimoline in the batter helps retain moisture by emulsifying and trapping air which makes the cake spongy.  Egg yolks are at the ribbon stage when they are pale yellow and have bubbles on top.  Egg yolks cannot be over whipped because of their high fat content.


Sugar stabilizes egg whites.  More sugar-more stabilized meringue.  Less sugar-less stabilized meringue.  It is important to keep the fat (butter) warm.  Warm fat emulsifies better.  Egg foam forms the leavener in sponge.  There is not baking soda or powder.  By adding batter to the melted butter, the mixture becomes less different in texture and emulsifies better.

Buttercream:
  • Make sure butter is soft.  If cold, warm in microwave at 50% power.
  • Pre-whip butter with paddle attachment.
  • Start meringue and sugar syrup at the same time.
  • Make the meringue.  Whites should be foamy without any liquid on the bottom of the bowl.
  • Cook water, sugar and glucose to 121ºc.
  • Pour sugar syrup down the side of the mixer bowl slowly.  Do not spatter on whisk or it will crystallize the sugar.
  • Turn speed up right away to aerate the mixture.
  • Whip until 37ºc.
  • Add butter when meringue is cool.
  • Will store at room temperature for one day, in the cooler for several and in the freezer for months.
There are three types of buttercream; Italian, French and Suisse.  Their quality is equal and makes them interchangeable.  Italian buttercream is good for cakes.  To make a chocolate Italian buttercream, add unsweetened chocolate.  French buttercream, which has egg yolks, is very rich and best for macarons.  Buttercream gives a strong structure to cake.

Whipping butter ahead of time cause it to lighten in color and texture.  Be sure that the meringue is cool before adding butter.  Have patience or the butter will melt and the buttercream will be ruined.  Butter is expensive.  Do not just throw away the buttercream if it seems ruined.  Try to trouble shoot and fix it.  

Piping Buttercream:


  • Soften buttercream with a whisk before placing it in a pastry bag.
  • Practice.
  • Only fill a pastry bag ⅓ of the way full.
  • Buttercream melts in a warm hand.  Once the buttercream softens, squeeze it out and get fresh.  If buttercream is too runny, it will not have good definition.
  • Consistency is most important.
  • Shell tip.  Shell border should have a teardrop shape and each shape should be individually visible.  Do not pipe shells too close together.  Do not lift bag up and down.  Squeeze, stop squeezing and pull.
  • Star tip.  Rosettes should be piped with bag at a 90º angle and should not have a tail.  Tight spiral with ends "tucked" in.
  • Round tip.  Bead border (snail trail) should be a nice continuous tear drop.  Dots should not have peaks.  Swiss dots, cornelli lace and scrolls look better when piped from a smaller (#1) tip.  The point to a scroll is elegance.
Draw a design in your head before beginning on a cake.  Pipe the basic body and then fill in the details.  

Buttercream Piping Evaluation:  Choose your most difficult style and fill a board.  15 minutes to work.  No erasing.  I chose scrolls.  Chef Meghan told me to watch my tails, smooth out the lines by using even pressure and watch the start and finish.

Tuesday

Torte the cakes:

  • Torte the sponge horizontally twice.  This makes three pieces of cake and two layers of filling.  Score around the cake first, while turning the turntable, until the cake is evenly sliced all the way through.
  • Cut the cake right before it is frosted and keep the layers together or it will dry out.
  • Keep the layers even while the cake is built so that the cake will be straighter.
Building the cake:

  • A cake board acts as a foot to a soft cake.  
  • Either, pipe around the edge of the cake to keep in soft fillings or spread buttercream to the edge of the cake using an offset spatula. 
  • Crumb coat immediately.  This should be a thin layer.
Frosting the cake:

  • Use room temperature buttercream.
  • Buttercream is airy, which will leave air pockets on the cake when it is frosted.  
  • Use a whisk or paddle on low.
  • Cold buttercream is too hard to frost and water will separate from the butter.
  • Buttercream should be the consistency of mayonnaise for frosting.  It should be firmer for piping details and maintaining crisp edges.
  • Spread buttercream out on top of cake.
  • Fill in the sides of the cake with buttercream to even them out.  
  • Spin the turntable smoothly and somewhat quickly to create and even coating.
  • Pull in edges on top of cake with an offset spatula.  Top layer of buttercream should not be more than ½" thick.
  • Work quickly when doing a finer coating. 
  • Blowtorch metal bench scraper to warm it up.  This creates a cleaner finish.
  • Lift and transport cake to a sheet pan using an offset spatula.
  • Keep in cooler or buttercream will sweat. 

Stacking the cake:

  • Coffee stirrers may be used with a biscuit because it is a light cake.
  • Wooden dowels from the craft store may be used for heavier cakes.
  • Push them down into the cake, measure it and cut with scissors.
  • Add as many dowels as is necessary to support size and weight of cake.
  • Cover the coffee stirrer marks with buttercream.
  • Leave the middle empty so one long dowel can be pushed through the entire cake.  This will stabilize the cake and make it easier to transport.
  • Sharpen one end of a wooden dowel with a pencil sharpener.
  • Cut dowel a little shorter than the height of the cake.
  • Use a rubber mallet to push dowel through cake and cake board.
  • Seal hole with buttercream.

Piping a cake with Italian Buttercream:

  • A cold cake is easier to pipe on.
Rose pastry tip:

  • Buttercream roses need to be frozen on parchment squares and then peeled off and place on a cake.
  • Royal icing roses will harden at room temperature.
  • Practice rose buds and roses using buttercream.
  • 3 petals make a bud.
  • 5 petals make a rose.
  • Pipe in odd numbers.

Wednesday

Third Stage:

Floriol - 1220 W. Webster Ave, Chicago, Illinois

7:00am - 12:00pm  Owner: Sandra Holl    Baking Manager: Betsy Grzywa

I began the day by egg washing croissants and popping them in the oven.  They need to be baked until they are nice and dark.  I made toasted hazelnut butter next by toasting hazelnuts and removing their skins.  The skins are easily removed by rubbing them together right after they have been toasted.  I removed the skins on a bucket of cold, previously toasted hazelnuts and the skins were stubborn.  I even popped them in the oven briefly.  After the skins have been removed, the hazelnuts are spun in a food processor until the resulting butter is very loose.

I washed and pitted cherries the rest of the morning.  I learned the hard way to wear gloves. My hands were stained.  I realized my mistake half way through the process.  I used a very efficient cherry pitter that rested on a mason jar.  Cherry juice splattered all over my apron but not on my shirt.  The cherries were a little past prime so they will be turned into jam.

Class:

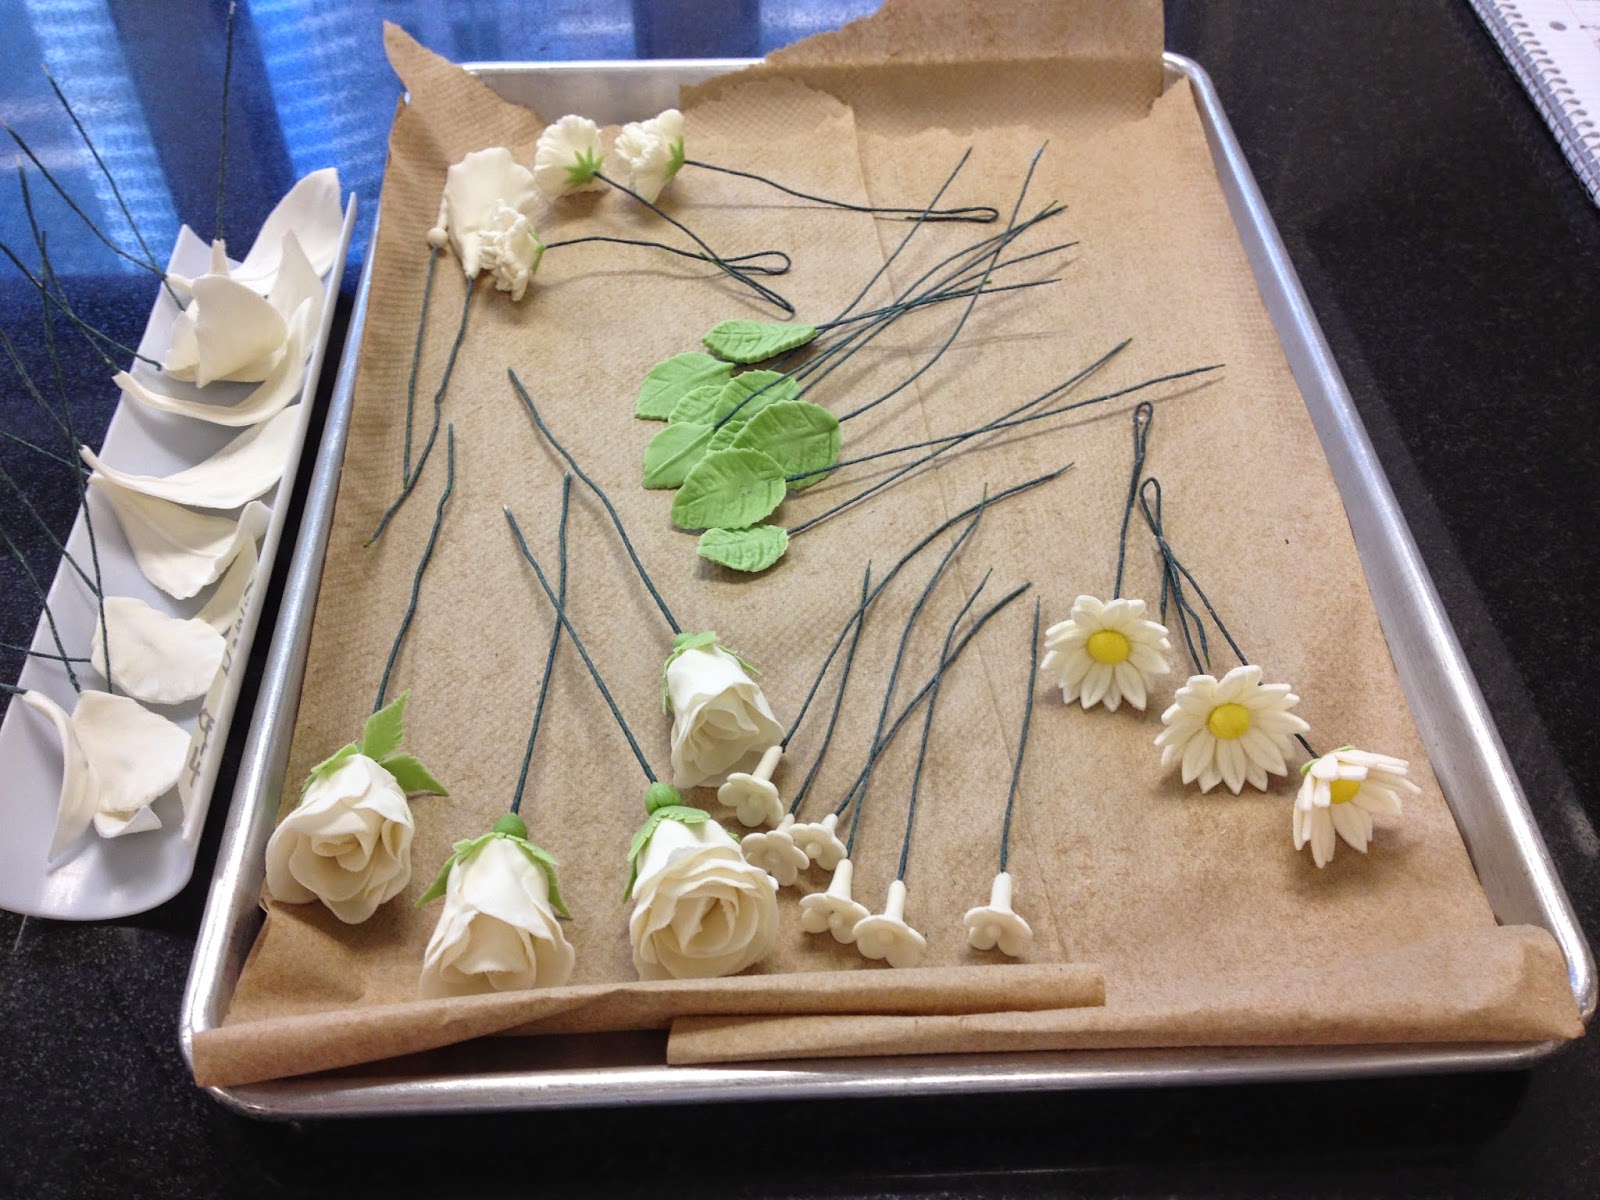
Gum paste Flowers 101:

  • Not easy to do.
  • Gum paste may be purchase or made from scratch.
  • Store bought gum paste is more expensive.
  • Gum paste is made from CDC, or drought plants, and tylose, which is a plant product.
  • Gum paste stays flexible when you use it but sets up when you stop using it.
Making Gum Paste:

  • Mise en place.
  • Sift 10x to get rid of any clumps.
  • Paddle egg whites for ten seconds to loosen them up.
  • Sift 10x to get rid of any clumps.
  • Add half of 10x to the egg whites.
  • Scrape down bowl.
  • Bring to medium peak using the paddle attachment.
  • Make sure all of the 10x is dissolved.
  • Sprinkle tylose very slowly over sugar mixture.
  • Put gloves on and knead by hand the shortening into the gum paste.
  • Add 10x until gum paste is no longer stickily.  Humidity affects how much 10x must be added.
  • Gum paste should be stretchy and elastic.
  • Wrap twice in plastic.
  • Label.
  • Place in zip lock bag.
  • Rest overnight in the cooler.  Tylose needs to rest overnight or it will not set up properly when used.
  • Gum paste will last six months in the freezer.  Defrost in cooler before using.
Flowers:

  • Flowers are made up of multiple parts; sepals, stamen, petals, calyx, leaves and stem.
  • Specimen flowers are meant to imitate nature and are more complicated.
  • Fantasy flowers resemble something found in nature but break the rules of color, size and accuracy.
Flowers in our posy:


  • Rose
  • Carnation
  • Daisy
  • Orchid
  • Lily 
  • Blossoms
We worked on our flower centers today.

Thursday


Color Matching:   Color matching is important when a color is to be used repeatedly and is custom matched to a flower or fabric swatch.

We worked on our flower petals today.  I used a multi petal cutter for the first time.  It was a little tricky but faster than cutting each petal individually.  I also learned to wrap and hook a floral wire in a new way.  A number, hook number formula indicates how many times you wrap the floral wire around the wire before hooking it and then wrapping it again with a specific number of rotations.  

Thursday Evening

Dinner with my visiting brother-in-law, Kevin:


The Publican -  837 West Fulton Market, Chicago, Illinois

Cocktails: Dark N Stormy and an Old Fashioned
Appetizers: Oysters, pommes frites, house made pickles, bread service and, the house specialty, pork rinds.
Wine: Sauvignon Blanc
Dinner: Ribs and summer tomatoes on rye toast with fresh buffalo mozzarella.  
Dessert:  Too full.


Friday

We worked on finishing the outer petals and calyx of our flowers.

Turn in self evaluations:  14/15

Question:  Describe three mistakes you have made and what you learned from them.  Describe how the mistake affected the taste, texture and appearance of your finished product.

Answer:  Hazelnut Mousse:  This mistake came early on in the module and I had just lost my partner.  I was anxious and rushing to get everything completed.  I also had not yet learned to juggle my notes, the book and the scalings.  The hazelnut mousse includes two additions of cream; whipped and liquid.  I completely forgot the second addition of cream due to confusion (maybe the cream was in the cooler), lack of organization and preplanning or failure to prepare the recipe ahead of time in my mind.  I should have walked through every step before I began mixing the first ingredients.

The result was a dense mousse that also did not have the volume it should have.  This affected the height and width of the cake on the inside and outside.  When I ate the cake the next day, I brought it to room temperature and sampled each layer.  The hazelnut mousse layer had good flavor but it was not light.  It almost had the consistency of a buttercream.  I ate it and while most people may not  have noticed,  anyone here at the school would have picked up on it right away.

Chocolate Mirror Glaze:

I made the chocolate mirror glaze the first time with no incident.  The second time I made it, I forgot to burr mix it before pouring it over my World Cup cake.  I realized that I had not mixed it and decided to use it anyway.  It was a spur of the moment decision based on the fact that we had our frozen, unmolded cakes on the icing rack ready to go.  In retrospect, I should have popped the cakes back in the blast freezer, admitted to my partner that we forgot it (she didn’t catch it either) and burr mix the glaze and recheck the temperature.

The result was that our glazed cakes were full of air bubbles. The made the cake look messy and unprofessional.  In theory, the bubbles could have been easily hidden with chocolate decor but in reality, in the future, I must make sure that each step is completed well before moving onto the next step.  The worst part is that I was aware of a preventable mistake and I went through with it anyway.  

Caramelized Hazelnuts:

I was having trouble melting the sugar after it was crystallized.  The induction burner kept turning off and instead of moving to another table, or getting another burner, I continued to plug and unplug the burner to reset it.  Finally, I went to my neighbors table and finished caramelizing the hazelnuts.  The sugar stayed in a large crystallized state and the outside appearance was unappealing.  I also failed to chop each hazelnut individually and when I sampled the cake later, the large pieces were hard to chew and altered the crunchy to smooth ratio.

Next time I make caramelized hazelnuts, I will make sure the equipment is functioning and have a back up plan in mind if it fails midway through my recipe.  I have made caramelized hazelnuts since then and they came out much smoother, the sugar was melted properly and evenly and I cracked each hazelnut into thirds and quarters and the texture had a better tooth feel in the final product.


Question:  Describe how you feel your, "pastry attitude" can be improved and what attributes you would like to work on to become better in the kitchen.  What qualities do you observe in the chefs that make them successful?

Answer:  My attitude is changing each day.  I had a little anxiety during the time my partner was gone.  It was difficult for me to focus on each recipe while managing dishes and being unable to do two tasks at once. i.e.. making caramelized hazelnuts or a meringue, while things baked and needed monitoring in the oven.  It was easy to relax during chef demos and cleanup but I felt rushed the whole time.  I had a, “can do” attitude and worked very hard.  As I have written, I made a few obvious mistakes but I also learned a lot.  I very much enjoy the basic recipes in pastry and benefit from repetition.  

During the last four weeks, I have learned that working with the class is getting easier and most people really want to work hard,  pitch in and learn to be efficient in their own way.  I feel more relaxed taking a step back an not micro-managing the work process of my partner.  If something does not work out, well then, we will do it again and make a good effort to determine at what point the problem began and how to avoid the same mistake in the future.

The chefs at the French Pastry School are very accomplished in their careers and on a daily basis they exhibit patience, organization, and the ability to define and remedy mistakes.  I enjoy the strict enforcement of rules in the kitchen.  Having a leader set the standard raises the bar for everyone.  It also removes the finger pointing and infighting.  The rules create a structure for cohesiveness in the kitchen that increases our efficiency and interpersonal relationships.

I think I am coming a long way in not feeling that I have to explain myself when I receive a criticism or suggestions.  I say thank you and then give it some time to sink in so that I can analyze my process and feelings.  This gives me the time to decide what I need to focus on and how much work I need to do to improve.  


Typing up my notes each night has proven to be a great study tool.  It also forces me to organize my thoughts and reinforce the proper methods used during the course of making product.  Working clean, being organized, focus and attention to detail are the four main things I work on each day.  I have much room for improvement and keep it in the back of my mind at all times.  

Gum Paste Quiz: 8 out of 8 correct.

Homework: Read Croque en Bouche section of book.

Chef Jacquay Pfeiffer stopped by my table while I was practicing buttercream scrolls and gave me some tips that improved my work immediately.

Friday Evening

A few of my classmates came over to my apartment for some pizza and conversation.  We had a great time and commiserated about school and cake decorating.

Sunday

Fourth Stage:

Hot Chocolate - 1747 N. Damen Avenue, Chicago, Illinois.  Wicker Park neighborhood.

9:00am - 5:30pm  Owner: Mindy Segal

I started the day by rolling out brioche dough using rice flour so as not to add dough toughening gluten to the dough, cutting out circles and holes in the middle.  This dough is used for their donuts.  Several trays went up front to the cook's line and the rest were wrapped in plastic and stored in  the cooler.  I rolled out cocoa nib dough, cut them with a 2" fluted cutter and baked them for a plated dessert.  I over baked them and had to make them again.  Because the dough is dark, getting them baked all the way through without using color as a guide was the trick.  I then scooped 535 mini s'more shortbread cookies.  

My last task involved cutting out prerolled pâte brisés dough with a 6" fluted cutter.  This is the dough they use for their mini quiche.  The circle goes into a small pie tin and must be pressed in so that the bottom corners stay sharp and the ends keep their scallop.

Mindy Segal was in the kitchen the entire day and I was able to observe how she works.  Her standards are high and the kitchen is clean and well run.  I was able to sample fresh spun mint ice-cream with sugared fresh mint and chocolate.  It was delicious.


Final Thoughts:

Make a mistake once or twice, third time, there is a problem.

Hotels will occasionally ask for a wedding cake and being able to make a gum paste flower is a good skill to have.

A posy is a collection of flowers.