L'Art de la Pâtisserie Week 7
Monday
Exam Prep Day:
I arrived early to go over a time strategy with my partner. The moment we were unexpectedly redirected to an alternative kitchen classroom, not the one we are familiar with, the teacher told us what our schedule would be. The tables were set up differently and I did not know where tools, ingredients, cooler space or microwaves were. We gathered at the front of the room for instructions and questions.
My partner and I strategized how to divide the speed rack holding our equipment. I tool the top half and she took the bottom half. We also do not have shelving underneath our tables so I decided I would use that are for dirty dish storage.
We are graded on use of time, organization, execution of product and cleanliness. Waste counts against us. If a recipe fails, need to be rescaled and prepared, points are deducted. We are not allowed to work together. We have to wash our dishes as we work.
Baking ends each day at 6:15.
Pâte à bombe worried me the most. I scrambled the eggs a little bit each time I had made it in class. I scaled the recipe and used my infared thermometer. Once it came to 70ºc I strained it and put it on the mixer. It never came to a fluffy pale state. I rescaled the recipe and this time used my probe thermometer. Chef Sunny helped me understand how to stir properly. I took the mixture a little over 70º and then strained it in a bowl and put it on the mixer to cool. It is better to go over a little and have a few bits of cooked egg than to go under and not have the eggs coagulate. It turned out well.
I use the pâte à bombe to make the chocolate mousse. I had tiny bits of hard chocolate in my mousse when I finished. I used a spatula and whisk that had chocolate on them and when they seized up I reincorporated them into the mousse. I am going to bring extra spatulas and whisks from home tomorrow so that I do not have to run back to the dish sink to clean my only whisk in the middle of a fragile recipe.
I made the chocolate mousse again, being careful to use clean utensils, and it turned out smooth and delicious. I popped them in the cooler to taste tomorrow.
I drew stencils on parchment to practice piping my buttercream cake. Straight lines with three inch marks and simple scrolls are the foundation of my two piping skills. The cake design includes a shell border and scrolls around the side with small detail over piping.
I used leftover buttercream to practice scrolls. It is easier to practice on the table then to actually pipe on the side of a cake.
Tuesday

I picked Piper, my daughter, up at Midway Airport this morning. I have not seen her since Christmas and she was a sight for sore eyes!
Exam Prep Day:
I began the day by organizing my scaling labels. I plan to scale all the recipes on the first day. Other people are going to scale on two days but I think it will be more efficient for me to scale the salts for all the recipes at the same time. I taped the labels to a hard plastic buttercream piping mat. This also enabled me to review the recipes in detail.
The hazelnut mousse is tricky to me so I gave it a practice round. It turned out well and I reserved in the cooler to test tomorrow.
I separated eggs for test days. This is the only pre scaling we are allowed to do. We actually were not allowed to scale them but rather make an estimate.
I practiced buttercream scrolls on the side of a plaster cake dummy.
What I would like to accomplish tomorrow:
- scale all recipes
- detrempe dough
- butter book
- turns 1 and 2
- caramelized hazelnuts
- chocolate biscuit
- dacquoise
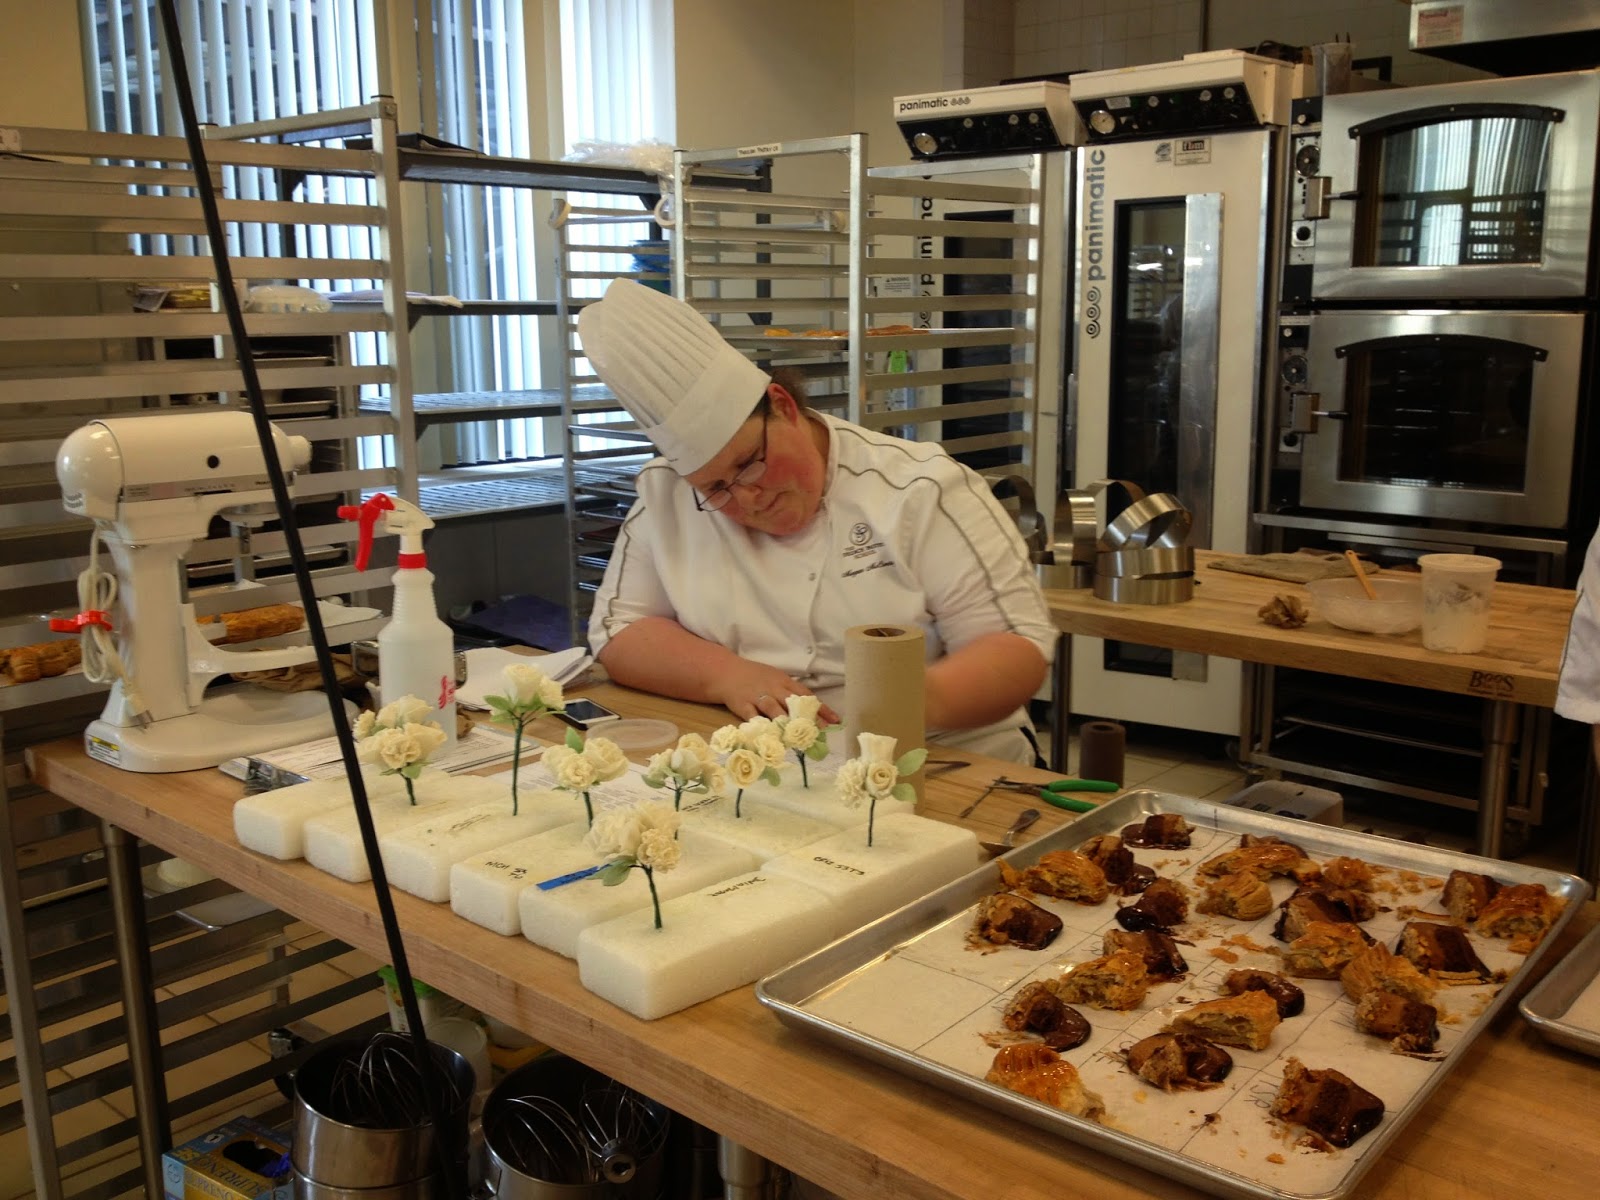
- rose cones
- carnation centers
- turns 3 and 4
Wednesday

Piper got her haircut at Trio Salon by Jimmy Marino. Jimmy has been cutting my hair since I was fifteen years old.
Practical Exam Day 1:
Class began with a written exam. Ten questions pertaining to entremet and ten questions regarding wedding cakes. I studied all of the recipes were are executing this week and skipped over the others. Rookie mistake. Three questions were specific to the nougat and raspberry silk cake. I made educated guesses but will remember in the future to read all of the recipes for the written.
I made the decision to scale all of my recipes first thing this morning. Most people scaled what they needed for today. I started getting nervous when I was still scaling and other students were starting to put their first cakes in the oven. Scaling all of the recipes means that I do not have to go back to each ingredient over and over. Scaling salt for five recipes at one time seems like an efficient method. I questioned this but kept going with my plan.
After I finished all of my scaling and labeling, I started on the biscuit. The pâte à bombe turned out nice and light and fluffy, the meringue was to soft peak and the butter and cocoa paste were melted without being scorched. I incorporated everything very carefully and maintained most of the volume. I poured the batter into two cake rings and put them in the deck oven. They baked beautifully and are full and light.
I decided to start the puff next. It needs to rest in the cooler for at least one hour before the butter book is folded in and then must rest again between folds. The goal is to get four turns done today.
I put my hazelnut flour in the oven for five minutes while I started incorporating the cold water into the flour for the puff pastry. I used one hand to mix and kept the other clean. This came in handy when it was time to go grab my toasted hazelnut flour from the oven. I used my right hand to mix the dough and my left hand to cut it with the bench scraper. This was a mistake because my right arm is so much stronger than my left. I kept going and made a mental not to choose more wisely next time. I rolled the dough into a shaggy ball, cut a crisscross on the top, wrapped and labeled the dough, with the time, to be stored in the cooler.
Next I caramelized my hazelnuts. I was very careful to keep the heat low to melt every sugar crystal. They are very obvious on the final product. I poured out the finished nuts, after cutting a couple in half to check for doneness, and then realized that I had not tossed them in cocoa butter. I slid them back in the pot, stirred in the cocoa butter and respread them on the silpat to cool. After they cooled, I cracked them into quarters with the back of a small, heavy pot.
I began the hazelnut dacquoise next. I made sure that the whites were whipped properly and that I did not deflate them when I folded in the TPT. I only used one silicone mold to fill with batter. I topped the batter with the hazelnuts, put them in the oven, opened the vent and set my timer for 7 minutes. They baked an additional 2 minutes but had great color and shape.
At this point, I knew I had to keep the puff pastry going so I got some acetate and banged some butter into a five inch square. I put this back in the cooler for the first roll in.
Gum paste rose cones and carnation centers had to be started today or they would not have time to dry and ready for more petals. I gathered all the tools for the rose cone and carnation center. I kept pretty good notes but little details about the carnation escaped me. They look okay and will improve with additional layering. I am holding off on making the rose leaves until tomorrow.
I wrapped the chocolate biscuit and hazelnut dacquoise in plastic, labeled them and neatly stored them in the cooler for tomorrow.
At 5:45, the puff pastry had been in the cooler for exactly one hour. I floured a silpat, folded in the butter book and rolled out the dough twice. I did not get to rolls four and five. I plan to do them first thing Thursday so that the fifth and sixth rolls are completed toward the end of class.
6:15 on the dot. Time to clean the kitchen, do our duties and exit so the moppers can do their jobs.
I stored my scaled ingredients for tomorrow and the class speed rack. I like seeing the tray empty as recipes are completed.
This is the schedule I would like to accomplish on Thursday:
- turns 3 and 4
- pâte á bombe
- whip cream
- chocolate mousse
- hazelnut mousse
- assemble world cup cake
- rose petals rows 1 and 2
- carnation petals rows 1 and 2
- rose calyx
- carnation calyx
- rose leaves
- mirror glaze
- turns 5 and 6
- italian buttercream
- crumb coat buttercream cake
Thursday

My scalings were ready on the speed rack so I began the day by turning folds three and four on my puff pastry. This should have been done on Wednesday but I figured I could let the dough rest for two hours, finish folds five and six and assemble the pithier on Friday.
I started the pâte à bombe and made sure to use the probe to get it to a higher temperature. It still turned out a little weak but it was light in color and good enough. I made the chocolate mousse and felt that it was a slight bit runny. Our recipes were cut in half and very small. It was hard to get any volume. I hand whipped the cream because it was too small to do in the mixer. This allowed for greater control over the cream and I think the mousse was very smooth. I pulled it up the side of the cake rings, placed the chocolate biscuit in the center and placed it in the freezer while I made the hazelnut mousse.
It is very humid and the praline and hazelnut pastes were nice and soft. I had no problem incorporating the cream and gelatin into the pastes. My dacquoise was a nice thickness and the cake went together easily.
I quickly put the rose petals and carnation petals on my flowers. Three gum paste rose leaves were also fast.
The chocolate mirror glaze has many ingredients but also came together very smooth.
My final recipe of the day was the Italian Buttercream. The meringue turned out a little grainy but it tasted good and had a nice consistency. There was not enough time to crumb coat my buttercream cake.
I quickly added the calyx to the roses and carnations.
Overall, I had plenty of time to finish all of my recipes and do my dishes. It was a long day and there was very little talking in the kitchen. I concentrated on getting things done in a logical order and not making any major mistakes.
On my way out the door, I realized that I had failed to put acetate inside the cake ring. Hopefully the cake will slide out easily before I glaze it tomorrow.
Goals for tomorrow:
- Crumb coat buttercream cake.
- Assemble Pithivier.
- Glaze world cup cake.
- Finish coat buttercream cake.
- Decorate buttercream cake.
Friday

The buttercream was at room temperature so I paddled in on low in the mixer to smooth it out. I crumb coated the cake to get it in the cooler as early as possible so I had a good shot at a smooth finish coat.
The World Cup Cake had to be turned in by 3:30 so I glazed it next. The glaze should not be heated above 37ºc and I heated it to 40ºc. I let it cool but it was getting somewhat of a skin and I did not want to incorporate bubbles into the glaze while stirring.
While the glaze was cooling, I wrapped floral tape around the flower wires and began taping the leaves together. We were being graded on the basic elements of the flowers and not how our posy looked ascetically.
The frozen World Cup Cake came right out of the cake ring after I torched the sides. The sides were smooth and the fact that I forgot the acetate did not seem to affect the overall appearance. The glaze was still at 37ºc but I needed to move on to the next task. I glazed the cake and the surface was smooth and bubble free. I put it back in the cooler but realized at 3:25 that I needed to turn it in. I quickly grabbed a half sheet pan and parchment, wrote my name on it and turned in my cake. I heard the teacher say that some of the cakes were frozen so it was hard to judge them. I hope mine had warmed a little.
I rolled cut in half and rolled out both sides of the puff pastry dough into 10" squares. I filled the center with frangipane and placed the second sheet of puff dough on top. I had a brand new exacto blade that I thought would help with clean cuts but when I started cutting the petals I did not get them all even and round. I used my knife to make the decorative cuts on the top and went too deep on the first couple of cuts. I reminded myself not to go to deep and it ended up looking okay. I popped it back in the cooler to rest and waited for others to complete theirs so we could go in the oven at the same time.
I finish coated my buttercream cake and placed it in the cooler to firm up. I wanted it to be firm so that the I could more easily pipe the side scrolls. While the pithivier was baking, I did dishes and cleaned up my area. Today is the first day that I was able to drink some water and take a short break.
While the pithivier was cooling, I decorated my cake with two piping techniques; scrolls on the sides and a shell border around the base of the cake. Our cut off time is 6:15 and I finished turning in my cakes at 5:45. I decided to get a jump on the dishes and help with putting away the ingredients on the community table.
Unfortunately, our class was very slow to clean and we were not finished with the kitchen until 7:45. We should have been done by 7:15. I had my sister and daughter waiting for me at my apartment and it was very frustrating.
Overall, I think I managed my time very well. Scaling everything on the first day worked very well for me because I never had to recollect deli cups and scatter myself about on a daily basis. My products were good but not great. We will find out our grades on Tuesday and I will be able to see how the product was graded. I stayed calm on a daily basis and did not have any major mistakes or problems.
The process is draining and I did not eat or drink enough water during the entire week. Tarts are next and I am excited to move onto something new. Having my daughter here this week was great because I still had time to mentally prepare but I did not obsess over each day.
Friday Night

We went to the Slurping Turtle and had some ceviche and sushi. The service was terrible but the food was very good.
Saturday Afternoon


We walked to Eatily and started with espresso and a Nutella smeared brioche. It was down pouring outside so the people were hunkering down at tables and bars. The place is enormous and there are many choices for lunch. We decided on a cheese and charcuterie platter with a glass of Prosecco. My daughter bought a pizza to go and brought it over to our table but our waiter reprimanded us to cross eating in the dining area. The dining areas all run into one another so we did not really see a problem. Her pizza had a very charred bottom but the crust was very soggy. Our platter had a nice assortment and three sides of honey, fig, almonds and orange peel. Our Prosecco was dry and delicious.
We then went downstairs for a gelato. Heather and Piper ordered the salted caramel and I had the pistachio. We ordered the same size cup but they were each filled very differently. My gelato was very firm and their's was very soft. They were all delicious.
It was still raining very hard so we stopped in a Walgreens to buy two overpriced umbrellas. We continued to shop until it was time to walk to dinner.
Saturday Evening
We walked to Frontera Grill and put our name in at the front desk. We were told it would be two hours so we found a seat at the bar. Piper had a sparkling lemonade and Heather and I ordered the Topolo Margarita. Very delicious.
A table was available after one hour. My sister asked to close out her credit card and the bartender told her he did not have it and he was too busy to look for it. A few customers at the bar got involved and could not believe the cavalier attitude of the staff. My sister took care of it and they eventually found it but it was a far from ideal situation I spoke with the manager and they apologized.
Our dinner was okay. We had a ceviche sampler and then ordered three food truck dishes to share. We did not actually eat all of our food. It was a little bland and definitely not the best Mexican we have ever had. I will not be taking friends or family back during my time in Chicago. Piper did manage to order two margaritas without any questions, which was fun.
Sunday

Piper left early in the morning but her flight was cancelled and she was not able to get on a plane to Salt Lake City until 5:00 pm.
Heather and I took he bus to La Fournette for pastry. The macarons were excellent. She left for the airport around one and I was definitely sad to see them go.


